FR
FR

Plantonic 1000

Plantonic 1000 - Large-area electroculture device
Large Area

Plantonic 1000

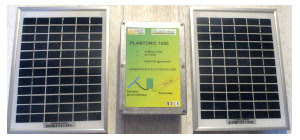
The PLANTONIC 1000 is our large-area electroculture solution. Equipped with two 10W photovoltaic panels and a waterproof electronic box, it stimulates up to 1000m² entirely off-grid.

500 to 1000 m²
2 × 10W solar
Zero carbon
Contact us
Features

Technical specifications

Area

500 to 1000 m²

Suitable for large plots (50m × 20m)

Power

2 × 10W solar

Two separate photovoltaic panels, fully autonomous

Impact

Zero carbon

Energy-autonomous, no consumables

Installation

February – March

Start at the beginning of the season to stimulate the soil

Large-scale electroculture

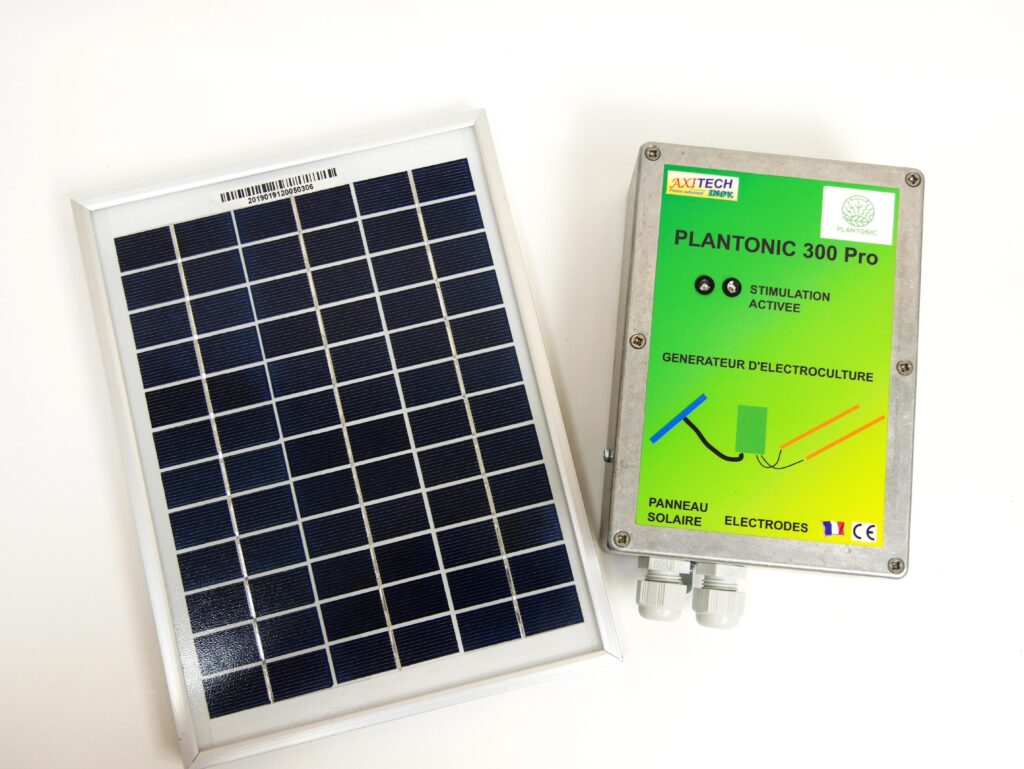
The Plantonic 1000 consists of a waterproof box and two separate 10W photovoltaic panels. When the unit is running, two LEDs flash on the front, indicating that stimulation is active. A third LED indicates that the panel has sufficient light.

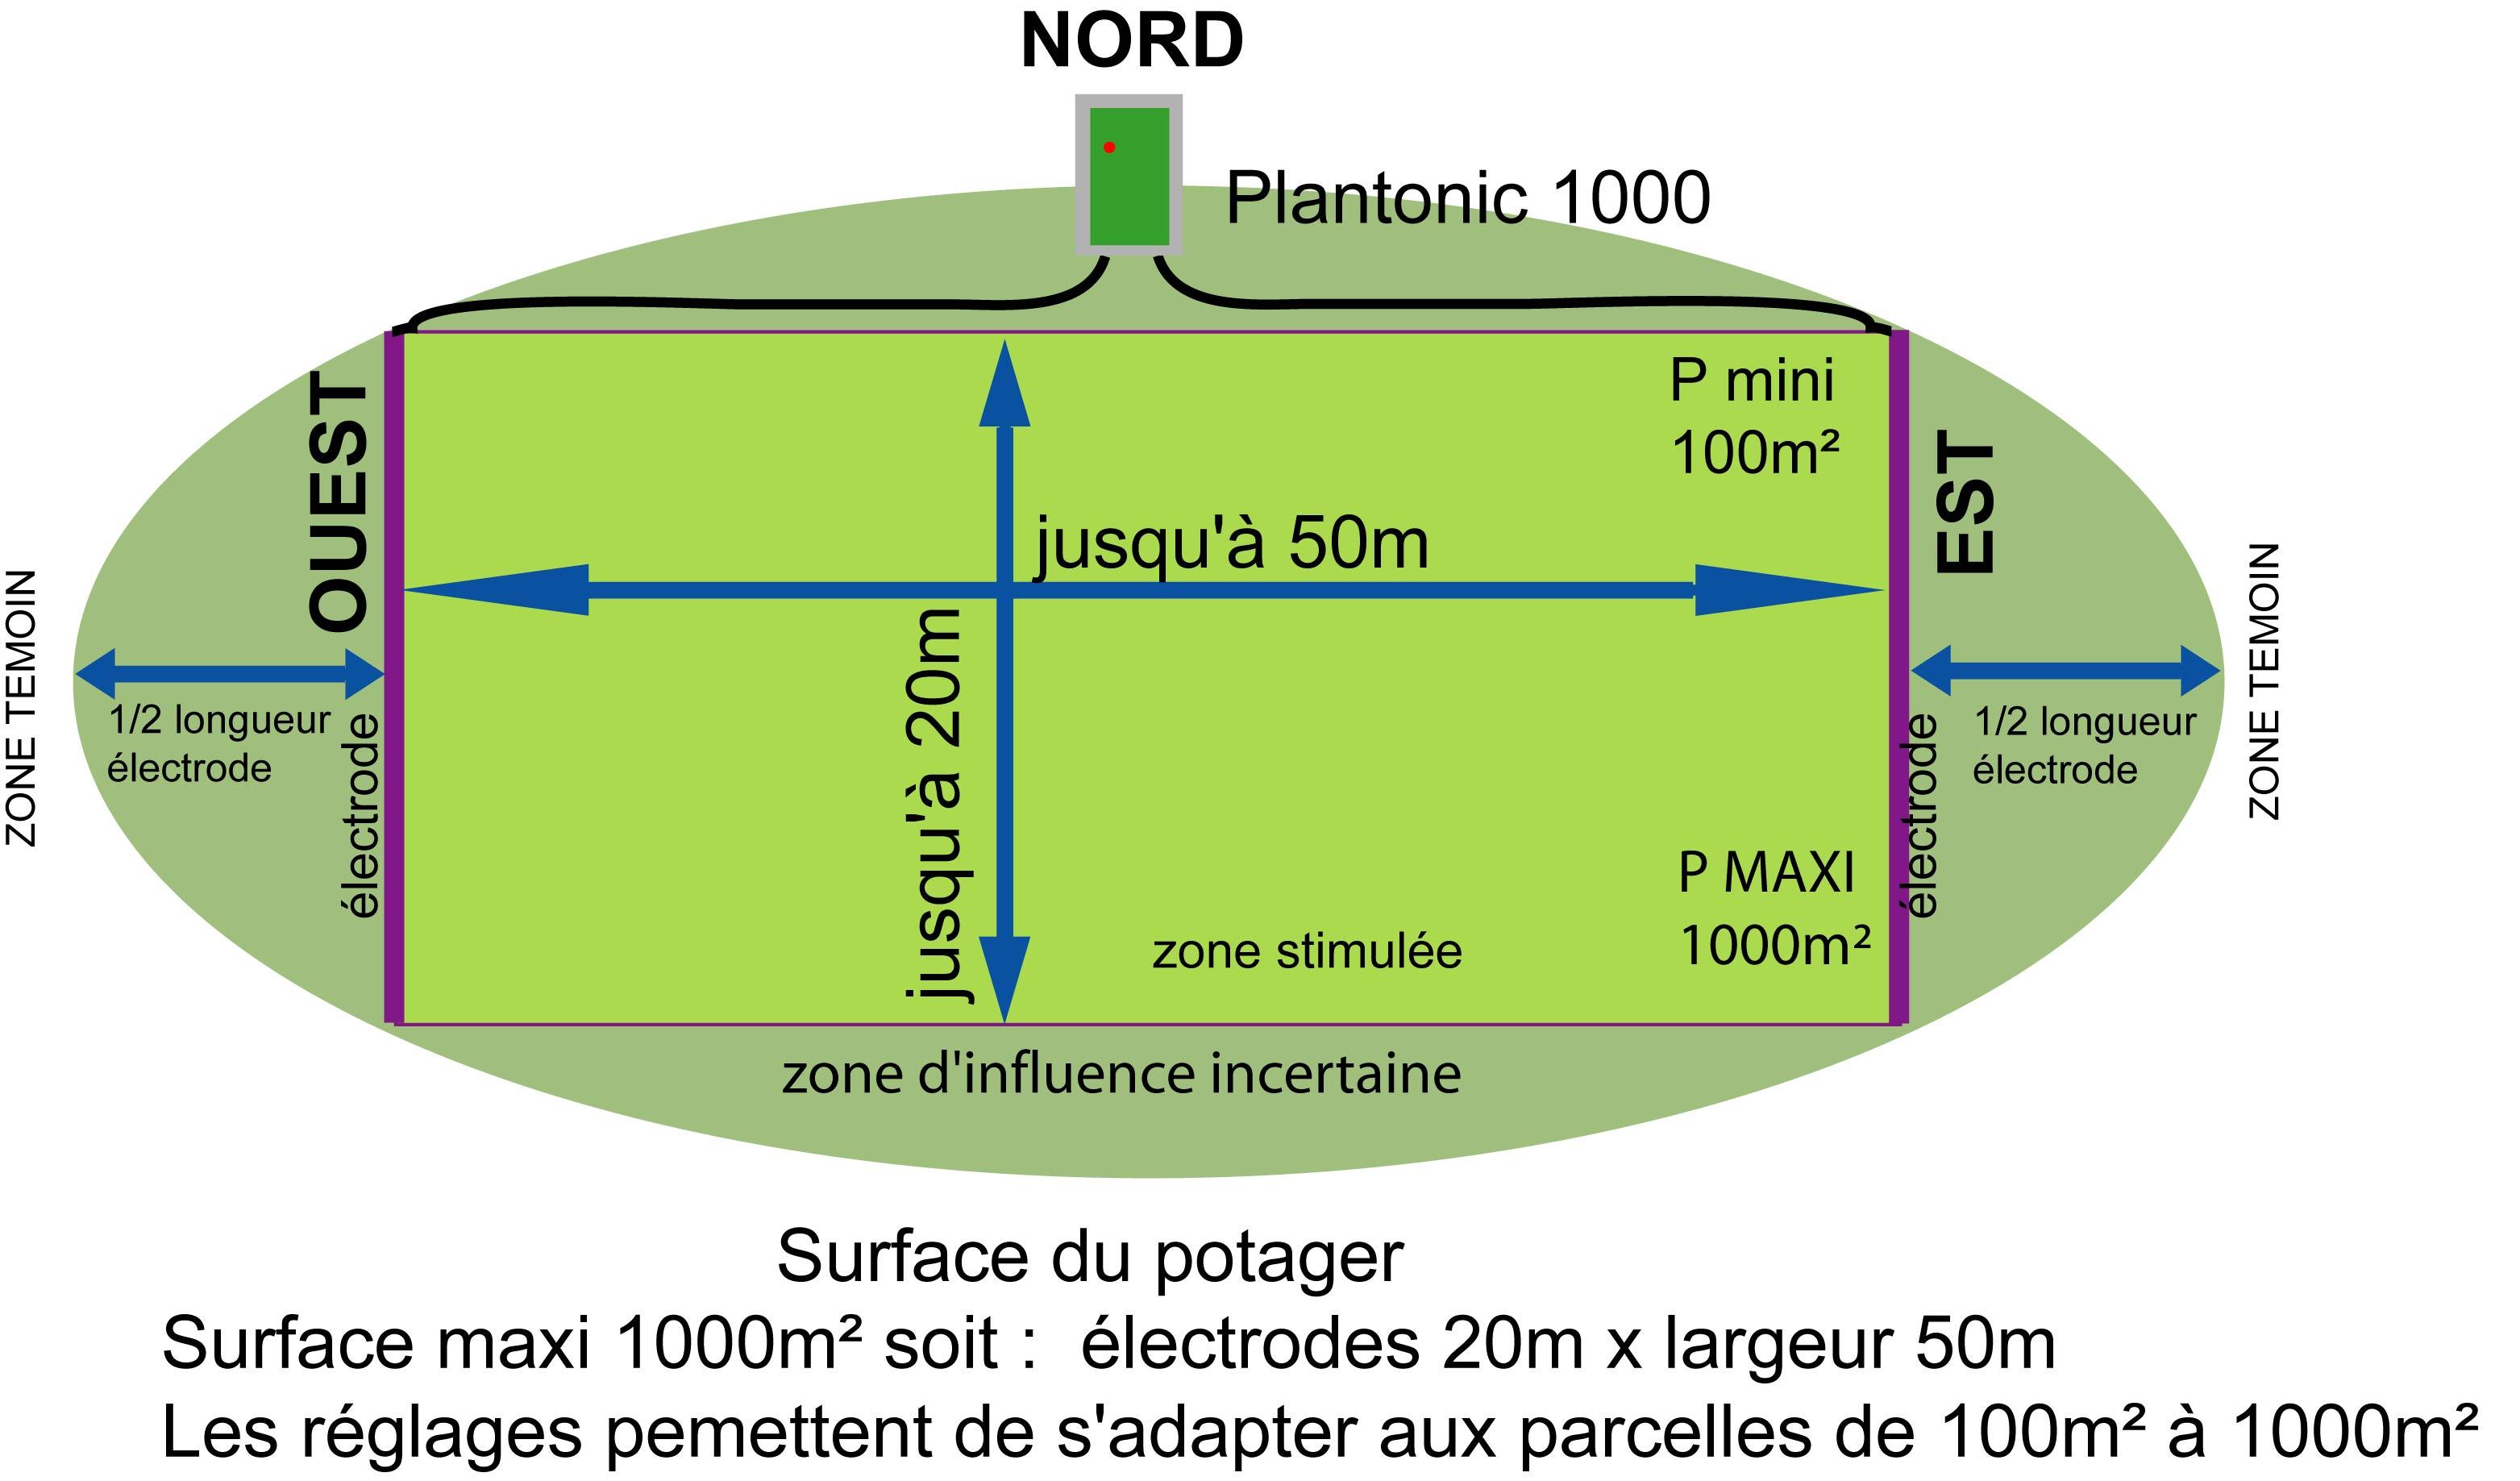
The PLANTONIC 1000 stimulates a 50m × 20m surface, i.e. nearly 1000m². Stimulation starts even with overcast skies and peaks in full sunlight. The unit can be adapted to plots from 500m² to 1000m².

The unit has internal settings to configure during installation. They allow you to fine-tune the stimulation to the plot’s surface: electrode length and electrode spacing.

  • Two 10W photovoltaic panels → fully autonomous
  • Waterproof electronic box with indicator LEDs
  • Adjustable settings for plot adaptation
  • Covers 500 to 1000m² of crops
  • 50% to 100% growth increase depending on plants
  • Compatible with BOOSTER to stimulate mycorrhization
Included accessories

Pack contents

Solar panels

2 × 10W solar panels + 10 metres of cable

Extension cables

2 × 25-metre electrical extension cables

Accessories

2 clamps for 10/12 tube + 2 plastic caps

Installation

Coverage diagram

Plantonic 1000 coverage diagram

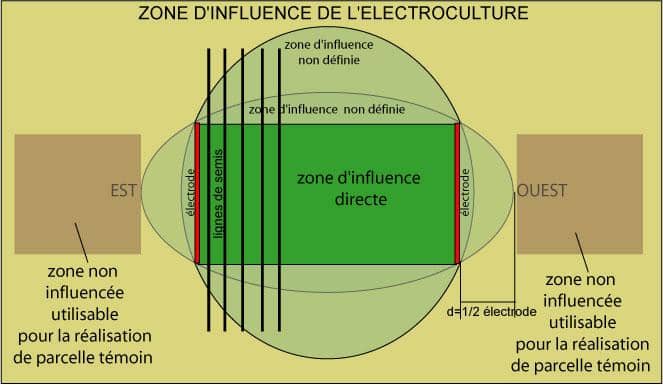
Plantonic 1000 stimulation zone → Area of 500 to 1000m² between the electrodes

Copper electrodes

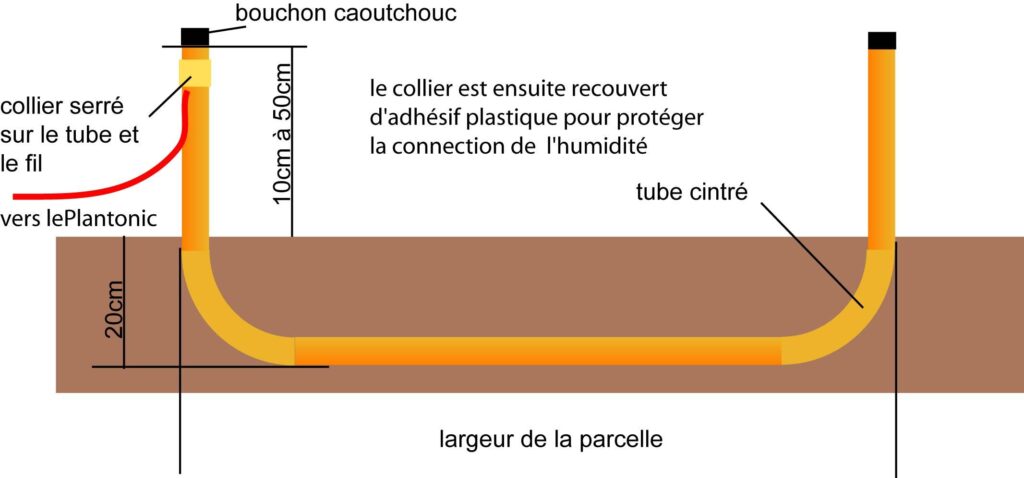
The electrodes are made of 12 or 14mm copper tube (available in DIY-store rolls). The tube is placed 20cm into the soil on the EAST and WEST sides, with the ends bent to form a U-shape. The two ends stick out of the ground.

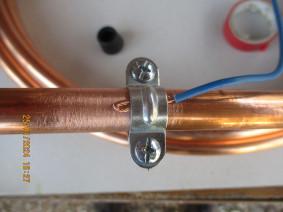
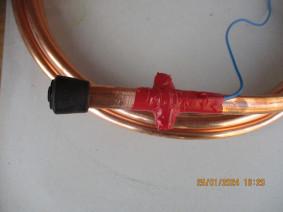
The electrical wire connects to the PLANTONIC unit via a clamp, then is covered with tape to ensure water-tightness. The tubes are sealed with the rubber caps provided.

Assembly

Electrode installation

Plantonic 1000 electrode diagram

U-shaped electrode

Mounting the copper tube into the soil

Wire mounting under clamp

Connection

Mounting the wire under the clamp

Clamp protection

Protection

Clamp protected with plastic adhesive tape

Performance and area of influence

The Plantonic 1000 shows significant efficacy on plant growth. Depending on the plants, growth increase ranges from 50% to 100%.

The direct area of influence sits between the electrodes. An additional egg-shaped zone also influences plants around the main rectangular zone. It stimulates growth and health of vegetable plants, flowering plants and fruit trees, even when diseased or weakened.

The Plantonic 1000 can also be used to stimulate rooting and growth of hedges along a 50m length with 2m electrodes. The Plantonic acts immediately and stimulates the soil gently and constantly — no sudden burst like a fertiliser shot.

Efficacy

Area of influence

Plantonic 1000 electroculture area of influence

Direct area of influence (dark green) and extended zone (light green) of the Plantonic 1000

Using the BOOSTER

The liquid BOOSTER, delivered in 2 small bottles, is poured directly into the copper tube of each electrode. Top up with demineralised or osmosed water up to 3cm from the top of the tube. Then seal both ends with the caps.

Rainwater is polluted and tap water is chlorinated — avoid using either with the BOOSTER. Use only demineralised or osmosed water.

Learn more about the BOOSTER

Interested in the Plantonic 1000?

Contact us with details of your project, the dimensions and orientation of your plot. We’ll send you a personalised offer with a free study for electrode placement.

Contact us

2026 Price List

Check our full price list for all Plantonic electroculture devices and accessories.

Download the price list

Planning your vegetable-garden project

Autumn is the ideal season to plan or modify your vegetable garden, based on
the flaws you noticed during spring and summer. The gardener should
imagine modifications, extensions, or simply the creation
of a new vegetable area.

The essential points

  • The garden’s surface, soil quality, possible or known pollution.
  • Orientation, sunlight, proximity of trees.
  • Water points for manual or automatic watering.
  • Protection against prevailing (west) and cold (north-east) winds.
  • A storage or compost zone for farm waste.
  • A shed for tool storage nearby.
  • A cold frame for seedlings or a greenhouse.
  • An electroculture device and its electrodes if you want abundant harvests of top taste quality and health prevention.

A vegetable garden should be set up for pesticide-free growing — no treatment products, no chemical fertilisers — using nature’s helpers: bees, earthworms, etc.

A 100m² garden for a family of 4 is enough to start. Too small means limited production. Too big risks discouraging even the bravest if they don’t have the tools or time to match their ambitions. A garden means regular work between March and September, at least 1 hour per day. The hardest part is preparing the ground in February-March — the soil is often too wet or full of weeds, and only manual work will do.

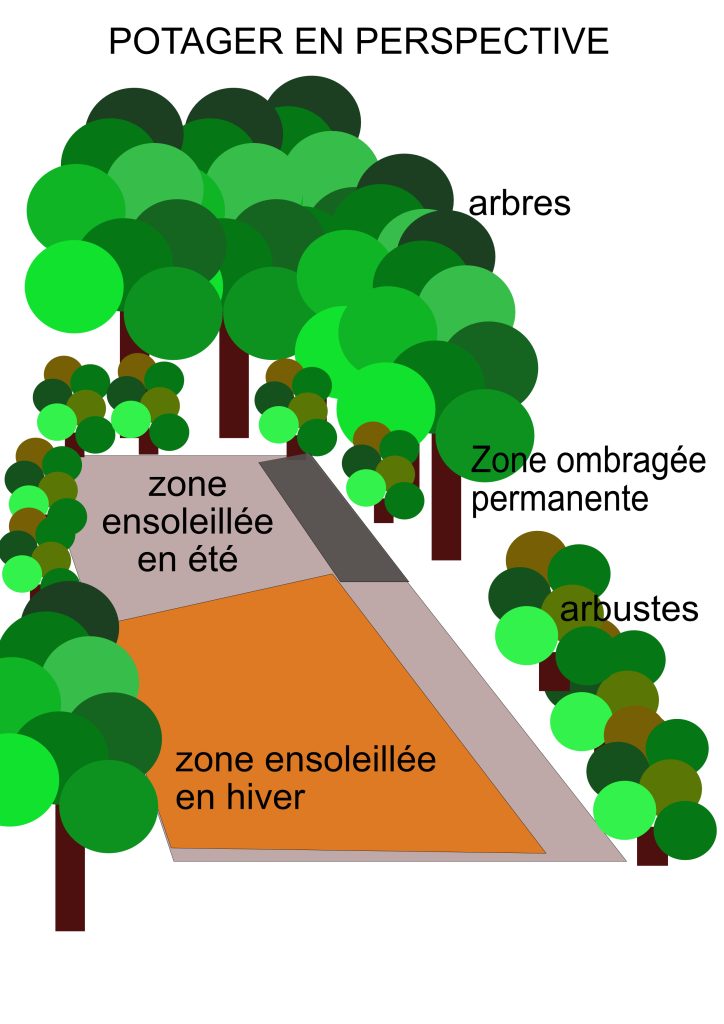
There are 3 main zones whose characteristics vary with sunlight, exposure to prevailing winds, rain, native plantings (trees, shrubs), buildings or screens. These elements create local microclimates over a few m².

— The winter-sunny zone is good for early plants and seeds that need quick soil warming to germinate, and for full-sun vegetables.

— The summer-sunny zone (when the sun is high enough). This zone suits summer vegetables planted from April-May.

— The permanently shaded zone is reserved for partial-shade plants, sensitive to strong summer sun.

Perspective diagram of a vegetable garden showing crop organisation and planting zones

You can also add to the project:
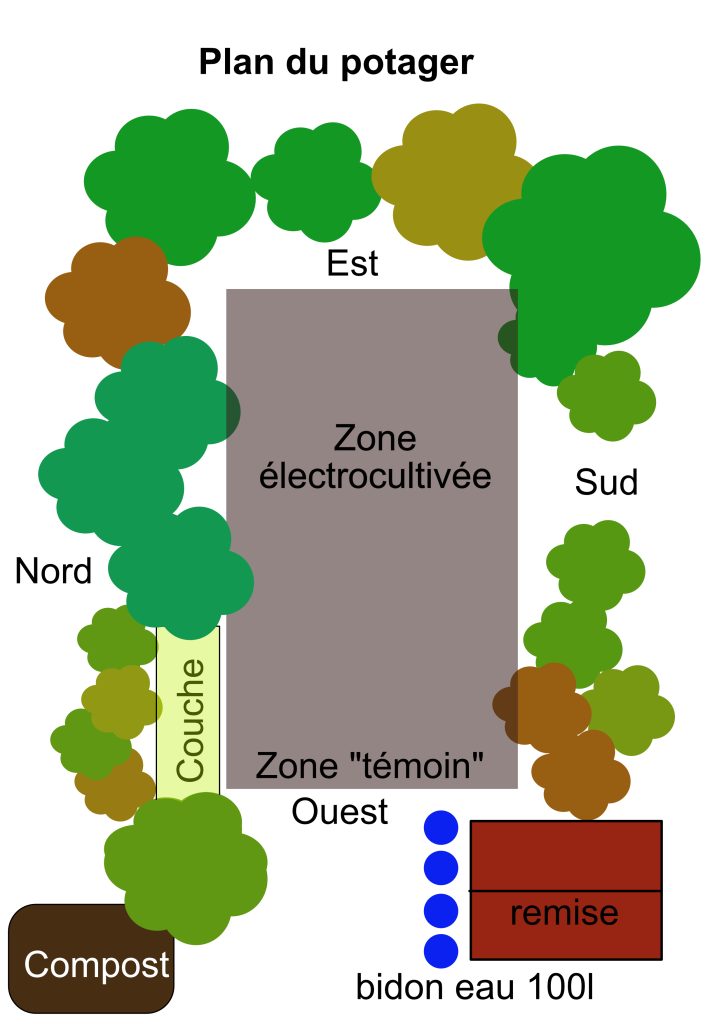
— One or more water reserves as 100L barrels — they must be covered to avoid rotting of fallen leaves and other debris. If the water comes from a gutter, a coarse filter and sand filter are needed. The water must stay clear. Watering with dirty water can cause leaf diseases or even kill plants. You can however add up to 5% urine. It’s up to the gardener to satisfy their need directly into the reservoirs.

Top-down diagram of a vegetable garden showing crop organisation, orientation and electroculture zone

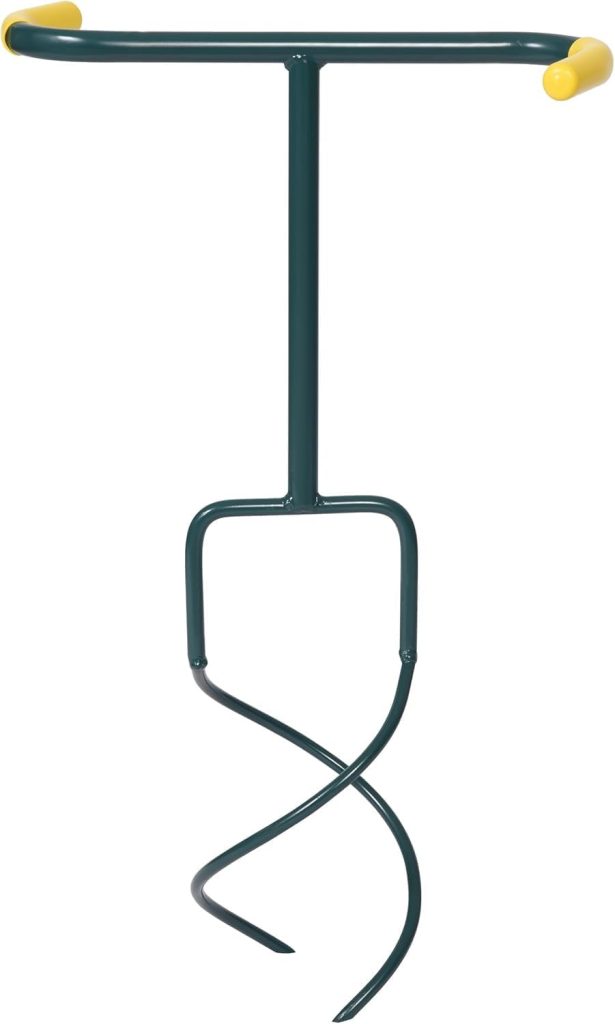
— A composting corner in the shade as a windrow or as an aerated wooden bin with two compartments of about 1m³ each, easily accessible. The compost should be watered in summer to avoid drying out, and mixed occasionally with a hook or a more practical aero-composter. Alternate layers of carbon-rich materials (dead leaves, wood bits, straw, RWB, etc.) and green manures, nitrogen generators (lawn clippings, grass, plant remains and kitchen scraps). This composting bin should be transitory — to apply residues quickly, before complete decomposition, on bare soil for in-situ composting. The composter becomes a storage place, not a transformation place for materials.
(learn more: see “Jardinez sur sol vivant” by Gilles Domenech, 2015, Larousse edition)

Compost stirring spring for aerating and mixing organic waste in a composter
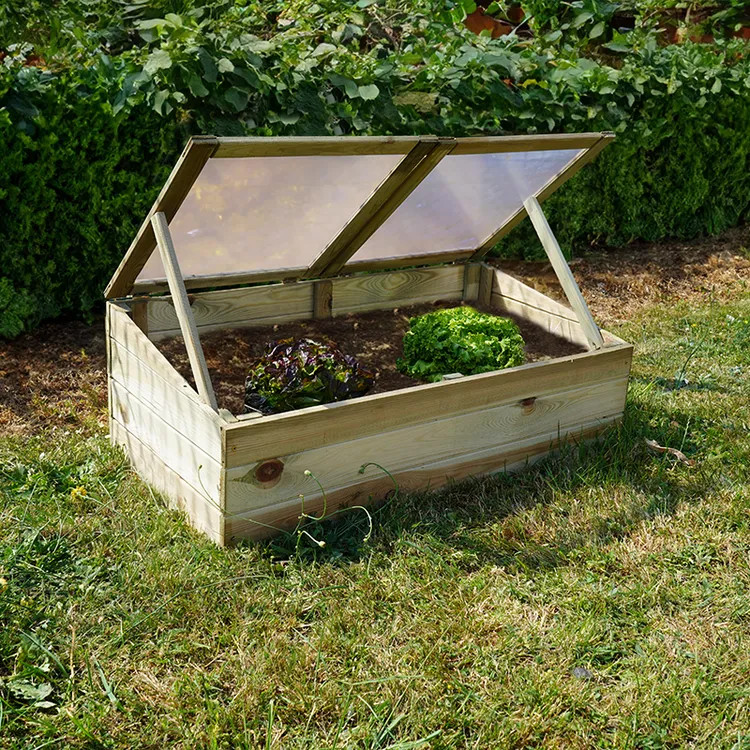
Wooden cold frame for seedlings and young plants in the vegetable garden

— A cold frame, i.e. a vegetable-garden surface surrounded by wooden boards and covered with removable glass panels (Burger brand). This south-facing mini-greenhouse lets you start seedlings as early as March, protecting them from cold and morning frosts. The frame can be heated at night in various ways. Use “special seedling” compost for good germination.

— A garden shed to store tools and machinery “dry” out of the rain, near the vegetable garden. The surface shouldn’t exceed 5m² to avoid the garden-shed tax (in France).

What is electroculture?

ORIGINS OF ELECTROCULTURE

BACKGROUND

The first experiments demonstrating the electrical activity
of storms and the presence of electrical phenomena in the atmosphere
date back to May 10, 1752. Thanks to François Dalibard’s experiment,
using an iron rod several metres long, he attracted lightning. He showed
that lightning was indeed an electrical phenomenon. Benjamin Franklin did his
famous kite experiment a few months later.
History remembered only Benjamin Franklin and not François Dalibard,
the latter being less famous than the illustrious American.

Benjamin Franklin invented the lightning rod. It protects tall
buildings from lightning damage by channelling the electrical flow
directly to the ground. People noticed that plants
grew much better at the foot of lightning rods.

A few inventors — Abbé Nollet in 1749, Abbé P. Bertholon in 1783 —
developed methods to fertilise plants and trees to
stimulate growth and fruiting. Trees were watered with
electrically charged water, for instance.

In the 18th and 19th centuries, research on this new
technique developed in the industrial world under the auspices
of war ministries. They saw an opportunity to
achieve higher yields to feed the population and the military
during conflicts.
A French engineer, Justin Christofleau, was a pioneer and
developed the technique of capturing atmospheric electrical charges
and improved it by filing numerous patents.

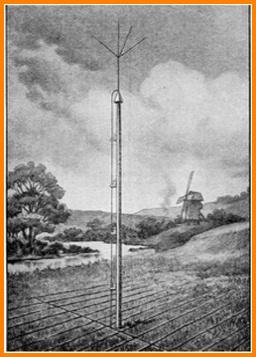
The principle: install in a field a pole several metres tall
fitted with metal rods angled at 45°,
called a “hedgehog”. An electrical wire from this hedgehog
ran to the ground, and wires laid on the soil
carried the electrical charges as far as possible from the pole,
forming a grid that stimulated the soil.
Unfortunately this technique suffered from a major problem:
poor reproducibility. From one year to the next,
results were unpredictable. These techniques were abandoned
and chemical fertiliser lobbies easily imposed their products on
intensive agriculture.

Strange cases of electroculture

José Carmen Garcia Martinez is a Mexican farmer who, through his
intuition, manages to communicate with the plants in his fields and obtains
fabulous growth. An excerpt of José Carmen’s method:
“José Carmen Garcia Martinez is a Mexican peasant who has never
learned to read or write — at least not in the language used by his peers.
Yet he maintains a singular relationship with plants, who respond to him
by reaching exceptional sizes and yields,
testifying to their understanding of his words and
encouragements. Cabbages weighing up to 50 kg, corn stalks
over five metres tall, chard leaves a metre and a half long,
or more than 100 tonnes of onions per hectare — surprising results
he has obtained for 40 years by covering his crops with compliments and tender words.”
(source: https://www.comingaia.fr/actualites/parler-aux-plantes)

Georges Lakhovsky’s rings
Besides his multi-wave oscillator that could heal
tumours in a few sessions, his electromagnetic process
was applied to sick plants and later
used to stimulate their growth.
The principle: surround the plant’s stem with a
metal ring whose ends don’t touch,
leaving a gap of a few centimetres. This metal circle
is held by small dry-wood stakes. It is
oriented north-south. The gap faces north.
The circle is tilted at about 20° from
horizontal. No external electrical stimulation.
The effect is astonishing: the plant grows
significantly more than a control.
Various configurations have been used with similar results: bare copper wire, plastic-sheathed copper wire, iron wire…
The electromagnetic explanation via electrical oscillation of the circle
is hard to demonstrate and measure — too weak, with a frequency that would depend on the mechanical characteristics of the circle and assembly. An informational explanation is another path, but multiple experimental protocols would need to be set up.

Got a vegetable-garden project?

Send us your plan. We’ll do a small free study for you.

Book an appointment

Comparing electrocultivated crops and controls

We’re in May: the ongoing crops have developed nicely. It’s easy to see the growth differences between the electrocultivated zone and the zone without stimulation, where the controls are. Our criterion will be measuring the aerial part — its volume is directly linked to plant height.

Potatoes

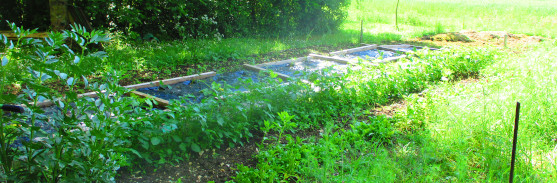
1Row of electrocultivated potatoes
The row of electrocultivated potatoes.

The photo opposite shows the row of electrocultivated potatoes 1. The control potatoes are to the right, in the sunny part, and aren’t visible in the shot.

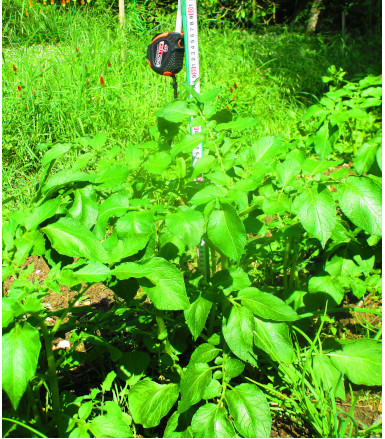
2Electrocultivated potato plant, 50cm tall
Electrocultivated plant: 50cm average height.

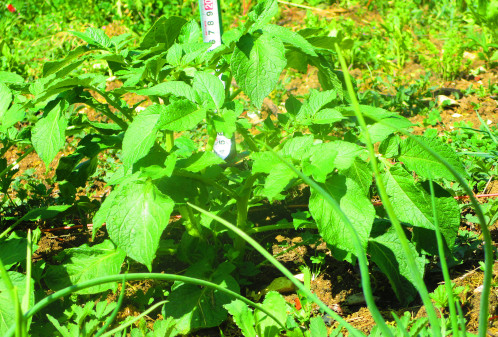
The average height of the electrocultivated potato plants reaches 50cm 2, while the control plants don’t exceed 20cm 3.

3Control potato plant, 20cm tall
Control plant: 20cm, no stimulation.

Thanks to electroculture, plant growth is doubled — in height and width — under strictly identical growing and watering conditions.

Planting tomatoes in open ground

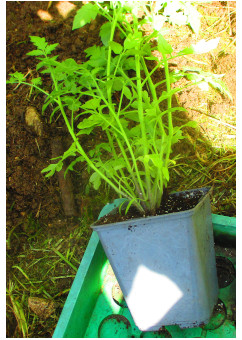
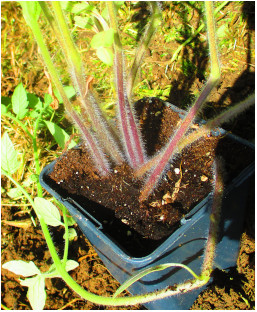
1Tomato seedlings growing in a bush shape in their pot
Tomato seedlings left in a bush shape in their pot.

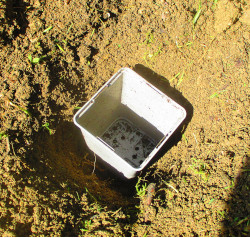
It’s early May and, given the mild weather, I’m taking the risk of transplanting the tomato plants before the Ice Saints. The seedlings were started by placing several seeds in the same pot; they all germinated. I let them grow in a bush 1, without selecting the most vigorous stem.

Method

2Pot placed in the planting hole
A hole twice as wide and deep as the pot.

Dig a hole twice as wide and deep as the pot 2.

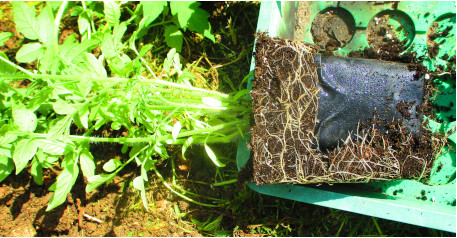
3Tomato root ball colonised by roots
The root ball fully colonised by roots.

When you remove the pot, you find the small seed-starter pot, which you can keep or take out.

Leaving the seed-starter pot avoids breaking the roots during repotting, and therefore stressing the still-fragile plant. You can also slit the plastic with scissors. This pot will be recovered when you pull up the plant in autumn — you can also use biodegradable pots.

You can see that all the soil added during repotting has been colonised by the roots 3.

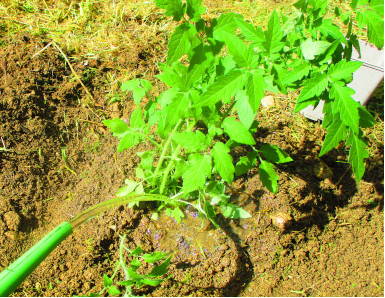
4Tomato plant watered after planting
The plant in place, stems partly buried, after generous watering.
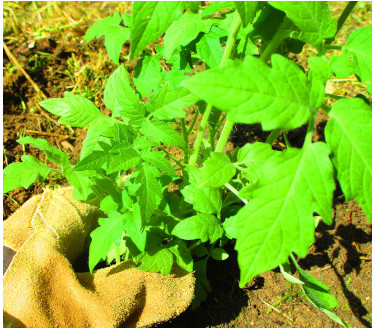
5Freshly transplanted tomato plant in open ground
Freshly transplanted tomato plant in open ground.

The tomato plant is placed in the hole then secured with fine soil, covering part of the aerial stems with soil. Finish with generous watering 4 5.

Tomato plant stems are hairy: when covered with soil, these hairs turn into roots. Hence the value of planting deep 6.

6Hairy stems of a tomato plant
The hairy stems: covered with soil, the hairs become roots.

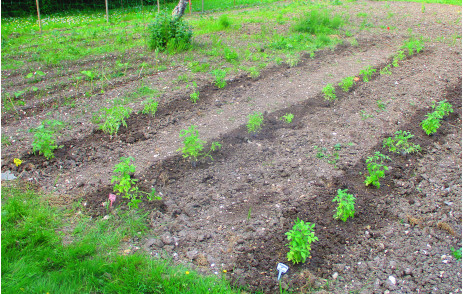
And there’s the job done! Each row is spaced about 70cm apart, and each plant 50cm. A simple pass with the mower will easily clean the aisles 7.

7Tomato field planted in rows
The field planted: rows spaced 70cm apart, plants every 50cm.

Water every day for the first 15 days — except in case of rain — to encourage fast rooting of the plants. Use clean water from a well or covered reservoir to avoid the proliferation of pathogens, and avoid watering the foliage. In electroculture, no treatment is necessary: blight is rare and usually mild. Pinching out side-shoots isn’t essential, except to air the plants.

Electroculture saves time and money

“I get the same results with compost or manure.”

I visited a customer’s vegetable garden where a large portion (200 m²) is covered with horse, chicken and pig manure, plus well-decomposed compost. He’s going to test the Plantonic on a barely-manured tomato area of about 20 m².

One advantage, he says, is that with Plantonic there are no more wheelbarrows of manure to move — and you can’t drive a mini-excavator into a vegetable garden anyway.

Quick maths: 20 m² × 0.20 m of manure = 4 m³, i.e. about 40 wheelbarrows to move. For his full 200 m² garden, that’s 400 wheelbarrows. You can measure the energy, time and effort that work represents.

Using 80cm-tall raised beds is also a growing trend: more practical, they save your back during weeding or harvesting. If the beds have no bottom and their soil is in contact with the ground, a single Plantonic is enough for a total surface of 300 to 1,000 m² — no need to install one Plantonic per bed (unlike beds isolated from the ground).

Another drawback of livestock manure: traces of medicines or treatment products excreted by the animals, plus the smells during storage and spreading. For compost enthusiasts, buying bags from garden centres is a non-negligible budget that can be reduced or eliminated.

For market gardeners, handling manure and compost takes a lot of machine time and burns fuel. Electroculture eliminates this work and lets you focus on more rewarding tasks while saving money.

When chemical fertilisers arrived, the sales pitch was easy spreading in a single tractor pass — same for liquid pesticides. But the investment cost (machinery + fuel) is staggering. Today, the pursuit of profitability calls for renewed techniques, delivering measurable savings for low investments, without depending on consumables whose prices are skyrocketing.

Electroculture brings many advantages to crops

  • The Plantonic technique works with small autonomous electronic devices, solar-powered.
  • The cost of the devices and installation is low — paid back in under a year.
  • The stimulated surface ranges from 1 m² to 2,000 m² to date, with a range of 4 devices.
  • Nothing prevents extending the surface with more powerful devices (> 1 ha).
  • Installation is simple and one-shot: no setup, no teardown.
  • No inputs or consumables needed for several years.
  • Technique almost weather-independent: sun is all you need for the solar panel.

Improved crops and harvests

  • Plantonic improves soil fertility and regenerates damaged soils by recreating the conditions of a naturally living soil with humus formation.
  • Plant growth is greater and harvests are more abundant.
  • The taste quality of fruits and root vegetables is significantly improved, as is their vitality for our metabolism (biophoton study: electroculture surpasses organic). Vegetables become true superfoods.
  • Healthy plants avoid diseases and predator attacks.
  • It stimulates the presence of pollinators and avoids costly pesticide treatments.
  • Eliminates the heavy work of handling manure and other inputs.
  • Lets you set up a “control” zone close to the stimulated zone to verify the technique’s effectiveness.
  • Protects the environment: no pollution, no pesticides.

Better profitability for your farm

  • Low investment, paid back in under a year.
  • Saves working time and energy: once installed, the device works alone continuously with minimal maintenance, and the stimulated surface extends easily.
  • Measurable productivity gain through more abundant harvests.
  • Top-tier production at mid-range prices, with better competitiveness against industrial production.
  • Time and energy saved: focus on the most profitable tasks.
  • 3-month “satisfied or refunded” guarantee (no refund requests received in 10 years).

Barriers to purchase

  • “Too good to be true” — that’s why we offer tests at your place, under our supervision, on a small area with a “control” zone and a stimulated zone.
  • The technique threatens sales of consumables, pesticides and seeds that keep farmers dependent.
  • It’s dismissed by agricultural advisors who don’t know it — like permaculture in its day.
  • It was developed by independent researchers, not by official research institutions (which only work under contract with major firms).
  • “If it worked, we’d know about it” — it’s been around for over 300 years; we’re just modernising and improving these techniques with 21st-century means.
  • It’s hard to question oneself for a technique outside the agricultural system — reassuring and alienating, but obsolete.

Comparative studies between control and electroboosted plants

Quantifying the effects of electroculture can become very complex and not very credible due to highly variable, hardly controllable — even random — growing conditions. A scientific approach is then essential.

Observations are made by comparing a “control” plot with a plot stimulated by our process. We had to define the control plot’s position: not too close to avoid being influenced by the stimulation, not too far so growing conditions remain the same.

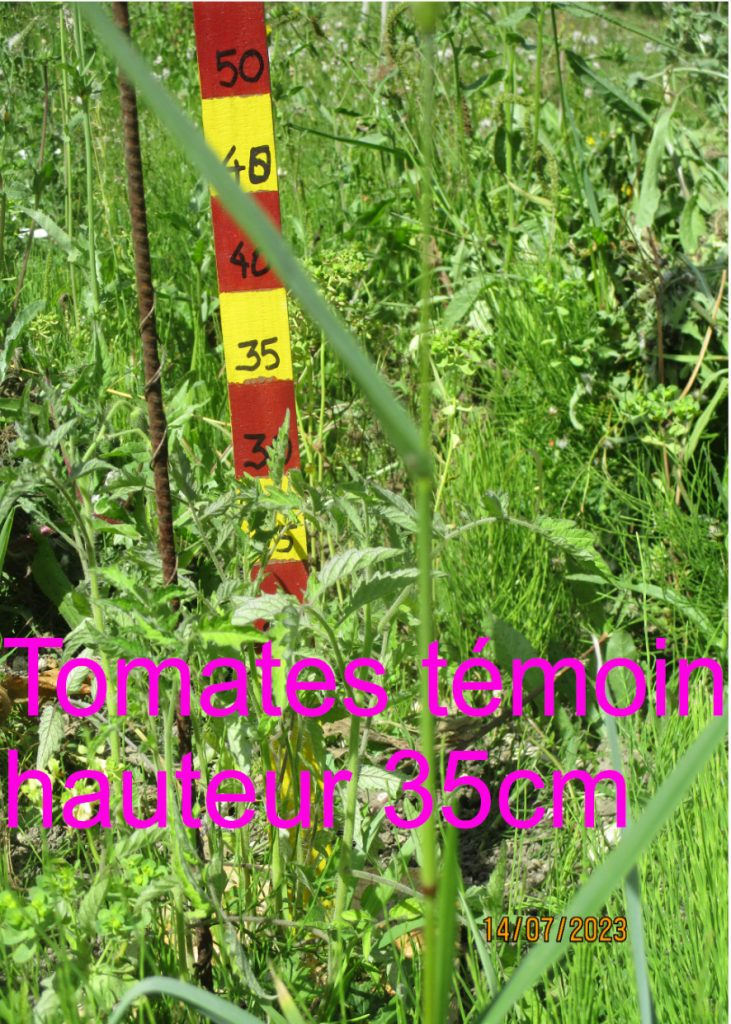
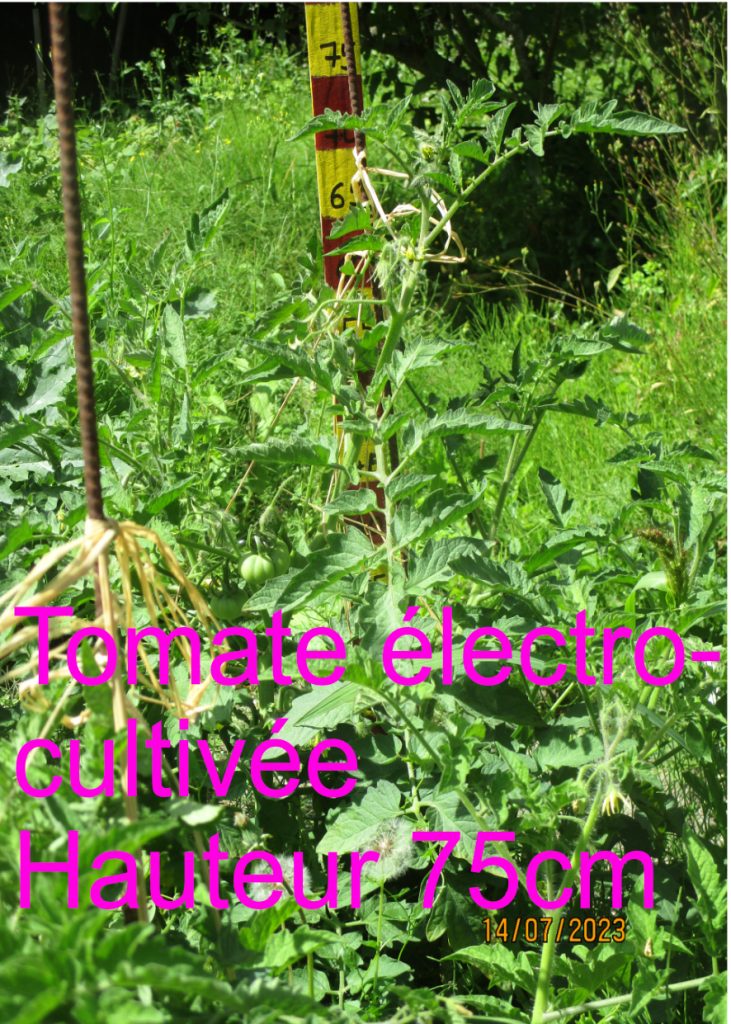
This comparison is made on plant growth and size, which must be the same in both plots. The simplest measurement is plant height with a ruler graduated in 5cm steps. This works well for tomatoes, since growth differences are clearly visible.

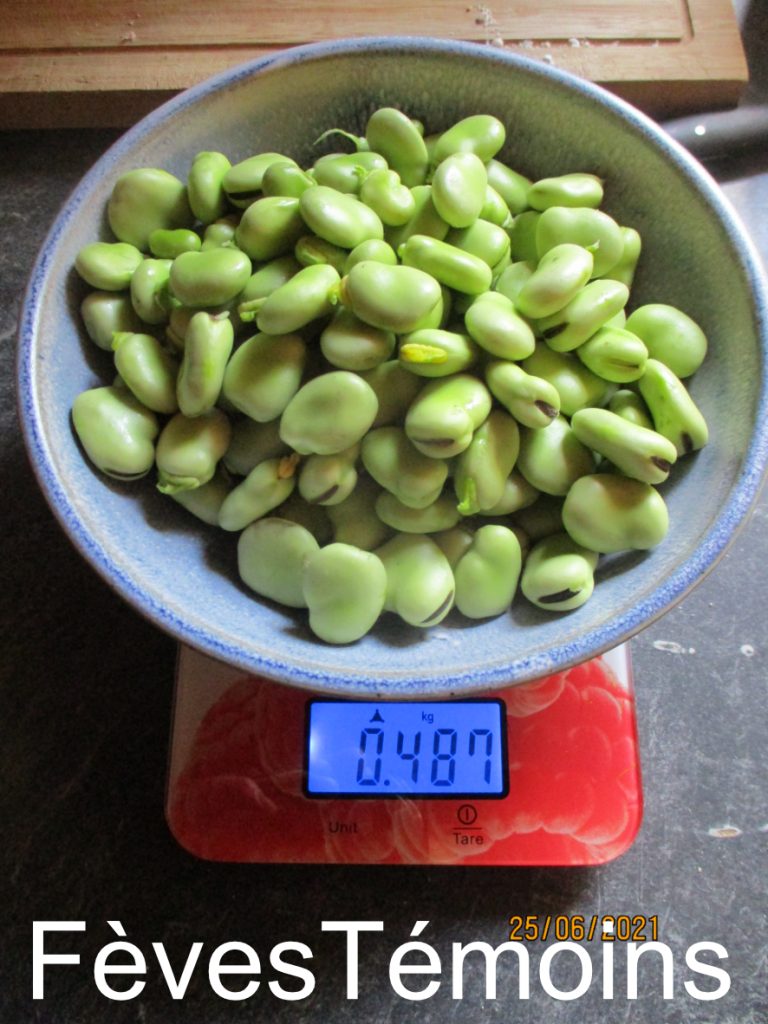
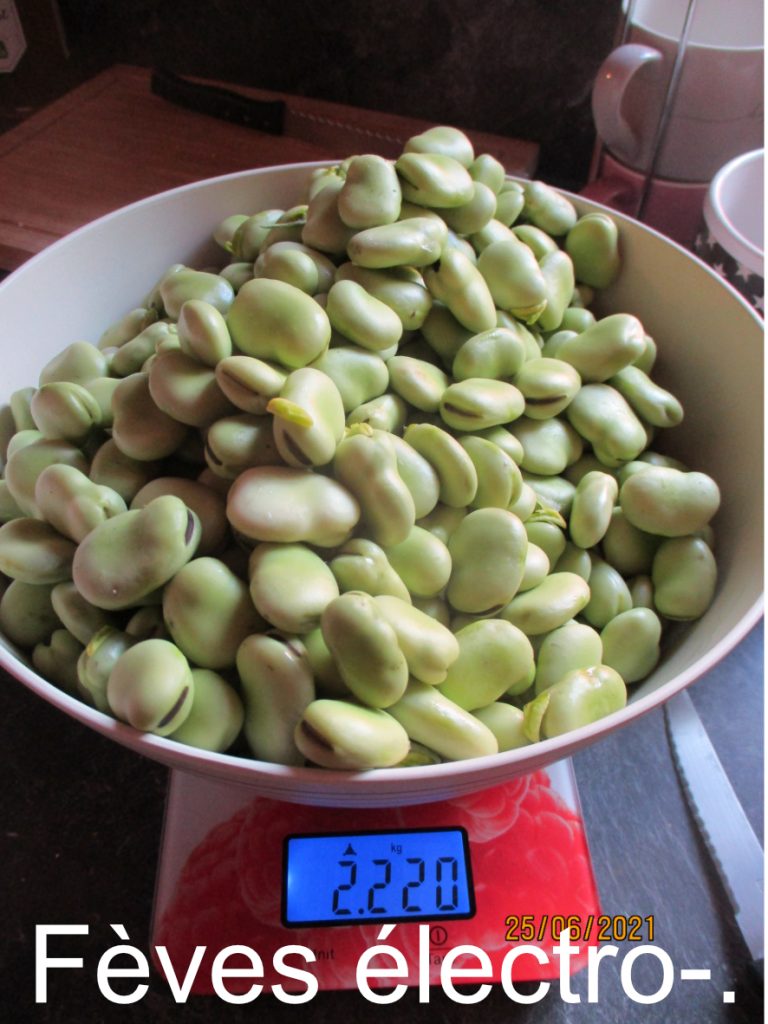
Another way is to weigh the fruits and compare harvest weights from “control” and stimulated plants. This method applies to white beans, green beans, broad beans, etc. You need to plant the same quantity of seeds, then calculate the ratio of germinated seeds that produced fruit vs. seeds planted at the start that remained sterile. Then weigh the harvest and calculate the weight per productive plant.

With electroculture the differences between plants and harvests are clearly marked. There’s no contesting the results found. Example harvests: control broad beans 487g and electroboosted 2,220g — a ratio of 4.55 times more harvest.

The difference between electrocultivated and electroboosted comes from an improvement of our process: sending electrical flows into the soil via electrodes and a PLANTONIC electronic device. In addition, we inject — into these copper-tube electrodes — a liquid carrying information that stimulates plant growth (see Booster page). The combined effects of these two techniques multiply the harvests. The electrical stimulation improves the soil and makes it more fertile; the Booster liquid’s information modulates that electrical stimulation and influences the plant. By analogy with a top athlete, the electrical stimulation is like physical training to develop muscle, the Booster’s information is the work of the sports coach who guides them.

Comparative studies through biophoton analysis

We entrusted biophoton measurement to the ENERLAB laboratory in
Nice in 2023 and 2025.
Two measurement techniques are used:
CCD camera measurement and Luminometer measurement.


Biophotons are light photons (light particles) generated by every living cell. Their quantity and colour vary and represent the health of those cells. If there are no biophotons, the cell is dead — only its skeleton exists and degrades. If there are many biophotons, the cell is very active, and absorbing such cells during a meal transmits vitality to our body and stimulates the metabolic reactions specific to that cell type.

Eating high-vitality vegetables is very beneficial for the body.

In 2023 the study focused on several Marmande tomatoes: 4 electroboosted and 2 control plants, whose seeds were planted in a window box in February and placed in an incubator at 22°C to stimulate germination and growth. A biophoton measurement was also done on two soil samples taken from the stimulated zone and the control zone. These are shown by squares on the graphs below.

A comparative study was made by measuring the biophotons of tomatoes bought in Nice. Imported tomatoes from Spain and Morocco, industrial greenhouse production, organic supermarket, local organic farm, control and electrocultivated tomatoes from our vegetable garden.

The result is unequivocal: the discrimination is clearly established — electroboosted tomatoes have far higher vitality than other commercially-available tomatoes, even above tomatoes from organic farms.

We repeated this study in 2025 with 4 samples of electroboosted tomatoes (red), 2 control tomatoes (green), one tomato from an organic farm (light green), and two imported (blue).

Again the result is unequivocal: our tomatoes are far above the commercial offer. Compared to the organic-farm tomato, our tomatoes have 60% more vitality, and our control tomatoes have 40% more vitality. All our plants are installed in open ground.

Another measurement made by the ENERLAB laboratory is the analysis of ARBUSCULAR MYCORRHIZAL FUNGI (AMF) on the roots of the various tomato plants. These fungi are essential helpers for capturing nutrients from the soil through the roots. For electroboosted tomatoes the rate is 98.95%; for control tomatoes it’s only 21.63%.

This study is published on the University of Florida website.

Our research

Laboratory

Our Research

More than eight years of research into plant electrostimulation. Discover our protocols, results and the prospects of this fascinating technique.

Our research

Is ELECTROCULTURE a science or a pseudo-science? When I look at internet sites talking about it, I’m appalled by the lack of rigour in the texts of self-proclaimed enlightened people whose arguments can be destroyed in 30 seconds. I understand that this technique isn’t taken seriously. Working with the living is difficult, especially in an environment where you don’t master all parameters. The drawback of old techniques (with poles and “hedgehogs”) is the strong influence of weather and environmental conditions. This causes a lack of reproducibility over time. One year delivers fabulous harvests; the next year is catastrophic. Moreover, it’s impossible to place a control zone nearby to compare results — essential in these agricultural techniques.

Our beginnings in electroculture

We’ve been working on electroculture for over eight years now. At the start we wanted to see whether this technique was proven or just a dead-end curiosity. As an industrial R&D office with agricultural land, it was easy to try a simple setup on a 50m² surface. The experiment was more than convincing — we observed significant plant growth. We decided to invest more deeply by developing techniques that are easy to implement and reliable over time.
The idea is also to share this technique with other curious people to verify it works on various agricultural soils across France, plus in overseas territories and in many garden and plant configurations.

Selling our devices
We developed the devices shown on this site under the commercial name PLANTONIC, which we sell on our site. We’re not an online sales site because we want to know the environment in which the device will be used and define, with the customer, the type of installation suited to deliver very satisfactory and convincing results. In return, our customers send us photos and observations.
To date, our technique has evolved a lot — we move quickly. We’ve made: retractions on some of our claims, lots of fruitless trials, imprecise protocols — but also astonishing observations. We continuously improve our process and devices. As we progress, questions accumulate that demand new protocols to test hypotheses, which makes this kind of research fascinating.
We’ve lifted a corner of the carpet and discover an unexplored world that, on certain points, questions many concepts about the plant and animal worlds and, more broadly, about living beings.

Results

In terms of applications, our technique increases plant growth and fruit production, but also gives plants good health — which eliminates pesticide treatments. It can heal them from certain diseases or predator attacks. The technique can also be used to clean polluted soils. It regenerates soil by stimulating microbial activity and humus creation. It increases aromatic-plant production and essential-oil quality. It also speeds up composting and improves compost quality. There are probably more applications we haven’t yet observed.

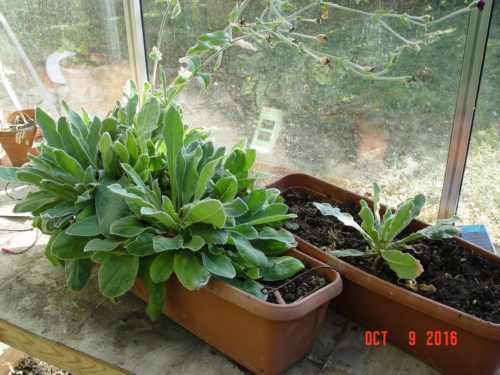
Comparison on 2 lychnis. The planter in the foreground is electrocultivated, the other isn’t. To be rigorous, both planters had 2 seedlings. In the standard planter, one of the seedlings died.

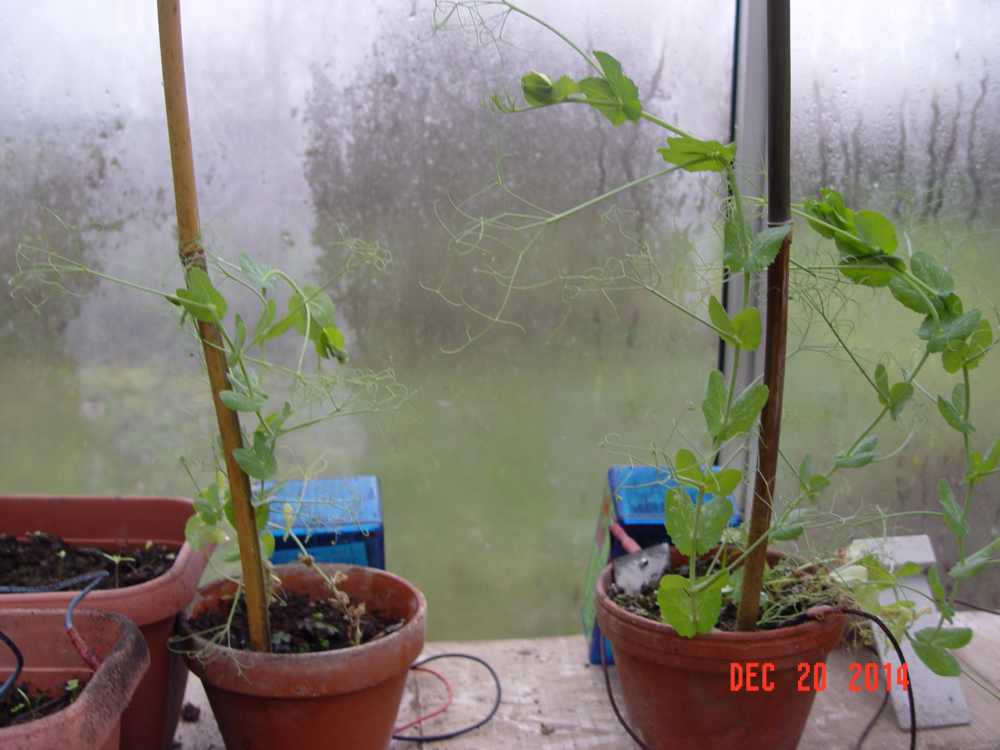
Comparison on a pea seed — control on the left, electrocultivated pea seed on the right. The difference is huge.

Basic concepts

There’s a technique to inject electricity into the soil: place highly conductive elements in contact with the soil and especially with the water in it. Old methods consisted of placing copper or iron wires in the soil a few cm deep. The electro-stimulated volume is the soil close to these wires.
To generate electricity, the ancients used natural electricity, present in the atmosphere several metres up. To do this, they planted a metal post 4–5 metres tall with several spikes forming a “hedgehog”. These collected natural electrical charges that flowed down to the foot of the post. Wires buried in the soil carried these charges as far as possible into the field.
The advantage of this technique is its simplicity and ruggedness, using easy-to-find materials. The drawback is that you control nothing — especially not the quantity of charges collected. These charges are extremely variable depending on weather conditions.
Through our process, we use a solar panel and an adapted electronic circuit to calibrate the quantity of electrical charges injected via the electrodes. We can measure this quantity, the injection period and duration. Through the electronic circuit we can vary the amount of electricity injected.
This lets us test plants at different stimulation levels and detect the minimum and maximum thresholds suitable for the plant.

Technique used in the 1800s/1900s — natural electrical charges were captured 5 or 6 metres up by a “hedgehog”. They were sent into the wire grid in contact with the soil.

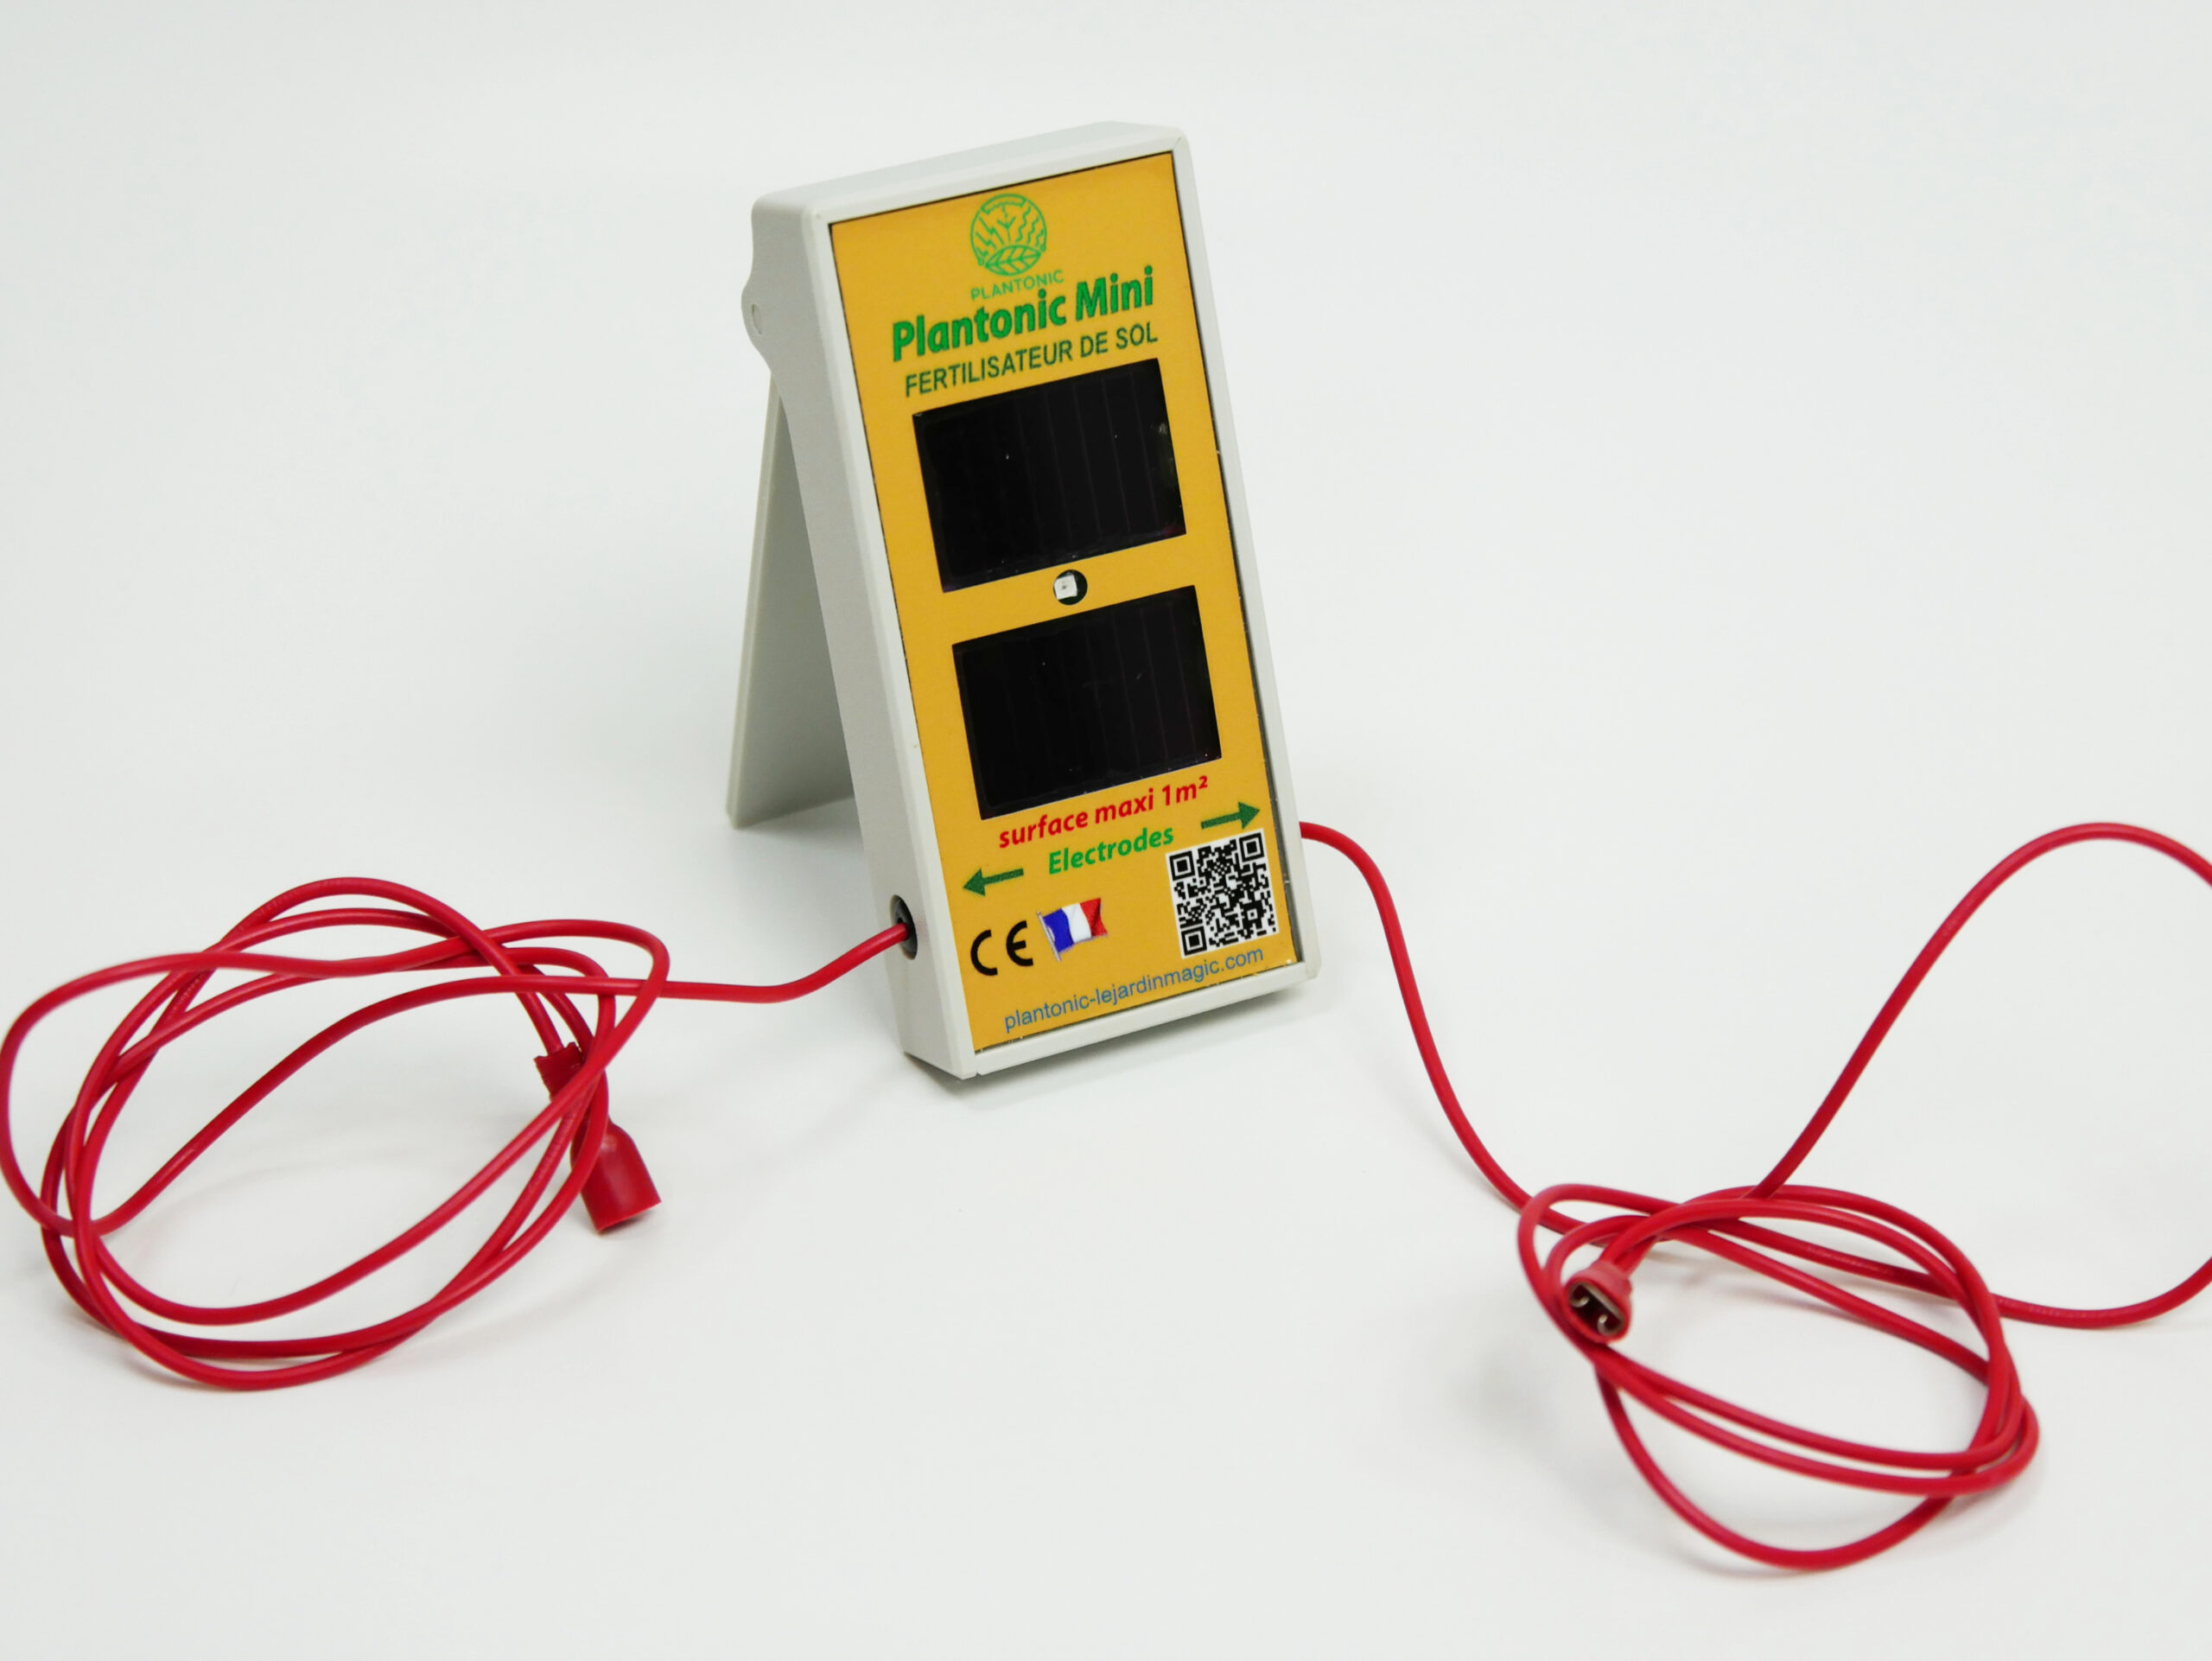
Modern PLANTONIC device — solar-powered electronic circuit that delivers calibrated electrical stimulation.

ENERLAB study on biophotons

We entrusted biophoton measurement to the ENERLAB laboratory in Nice in 2023 and 2025. Two measurement techniques were used: CCD camera measurement and Luminometer measurement.

Biophotons are light photons (light particles) generated by every living cell. Their quantity and colour vary and represent the health of those cells. If there are no biophotons, the cell is dead. Many biophotons indicate a very active cell — eating such cells transmits vitality to our body.

The 2023 study focused on Marmande tomatoes: 4 electroboosted and 2 control. A comparative study was also done with tomatoes bought in Nice: imports from Spain and Morocco, industrial greenhouse production, organic supermarket, local organic farm. The result is clear: electroboosted tomatoes have far higher vitality than any commercially-available tomatoes, even above tomatoes from organic farms.

We repeated this study in 2025 with similar results. Compared to organic-farm tomatoes, our electroboosted tomatoes have 60% more vitality. Our control tomatoes alone have 40% more vitality — all our plants are grown in open ground.

ENERLAB also measured the ARBUSCULAR MYCORRHIZAL FUNGI (AMF) on the roots of the various tomato plants. These fungi are essential helpers for capturing nutrients from the soil through the roots. For electroboosted tomatoes the rate is 98.95%; for control tomatoes it’s only 21.63%. This study is published on the University of Florida website.

Experimental observations

Over our years of experimentation, we’ve recorded numerous observations:

  • Seedling germination: faster emergence (8 to 15 days earlier), more vigorous plants from the first weeks.
  • Plant size: up to +100% growth in greenhouses, +50-60% in open ground.
  • Harvest yield: up to +61% compared to conventional organic farming.
  • Fruit quality: tastier, denser fruits, with higher biophoton levels indicating greater vitality.
  • Disease resistance: plants resist much better to pests and diseases without any treatment.
  • Pollinator attraction: bees and other pollinators are strongly attracted to electroboosted plants.
  • Soil regeneration: increased microbial activity, faster humus creation, better water retention.

Plant signal recording

We placed two electrodes between the main electrodes. On a computer, the signals detected by these two electrodes are recorded. The electrical signal is clearly distinguished between stimulation on and off. We also question the plant about this stimulation: we attach very fine electrodes to the top and bottom of the main stem. The plant’s reaction signals are recorded simultaneously. The observations are striking — correlations exist between the two signals.

Ongoing research

We continue our research on several fronts:

  • Extension to large surfaces: devices for plots beyond 1,000m² (up to 10,000m²).
  • BOOSTER optimisation: improving the liquid recipe for maximum effect.
  • Specific applications: vineyards, cereal crops, fruit trees, polluted-soil cleanup.
  • Information physics: exploring how plants process the stimulation signal at the information level, beyond pure electromagnetism.
  • Plant music applications: combining electroculture with the plant-music technique for therapeutic and agricultural applications.

Our research is independent. We don’t receive public research funding — it’s self-financed through our device sales. This gives us complete freedom to explore avenues that mainstream research wouldn’t pursue.

Get in touch

If you’d like to know more about our research, share your own observations, or collaborate on experiments, contact us at contact@plantonic.org.

Discover plant music

When plants create melodies tuned to our emotions. Discover this fascinating technique with promising therapeutic applications.
New Plantonic design

Plantonic gets a fresh new look! Our site has been completely redesigned to offer smoother navigation, a modern design and a better user experience.

Rest assured — all your usual sections are still there: our electroculture devices, plant music, our research and our books remain easily accessible from the main menu.

This new design highlights our latest news, our research results and makes it easier to access all the information about electroculture. Feel free to explore the different sections!